Pro Tip: The Art of the Braise - A Pitmaster’s Secret to Tenderness
Table of Contents [hide]
- Pro Tip: The Art of the Braise — A Pitmaster’s Secret to Tenderness
- What “Braising” Really Means (On the Grill)
- Why Braising Works So Well for BBQ
- The 4 Stages of a Great Pitmaster Braise
- Pan + Foil Rules (So You Don’t Kill Your Bark)
- Choosing the Right Braising Liquid
- Temperatures, Timing, and “Probe Tender”
- Common Braising Mistakes (And How to Fix Them)
- How This Pro Tip Shows Up in the “Bold & Braised” Box
- Cleanup & Grill Care (Don’t Skip This)
- More Ways to Cook With Us
Pro Tip: The Art of the Braise — A Pitmaster’s Secret to Tenderness
How to Turn Tough Cuts into Tender, Juicy BBQ (Without Losing Flavor)
If there’s one technique that separates “pretty good BBQ” from holy smokes, that’s tender, it’s the braise. Braising is how pitmasters take a peppery bark, a smoky exterior, and a tough piece of meat… and turn it into something you can pull apart with a fork—without drying it out or burning your sauce.
This isn’t complicated cooking. It’s smart heat management. You build flavor first, then you use gentle steam and moisture to finish the job. It’s exactly why this month’s box is called Bold & Braised.
What “Braising” Really Means (On the Grill)
In classic kitchen terms, braising means cooking food partially submerged in liquid, covered, at a moderate temperature until tender. In BBQ terms, braising is the moment you stop chasing smoke and start chasing tenderness.
On a smoker or grill, a pitmaster braise usually looks like this:
- Stage 1: Smoke/grill uncovered to build bark and color.
- Stage 2: Move meat into a pan with a small amount of liquid or sauce.
- Stage 3: Cover tightly (foil lid) to trap moisture and gently finish the cook.
- Stage 4: Uncover at the end to tighten the sauce and re-set the exterior.
It’s not “boiling meat.” It’s controlled, covered finishing that lets heat and moisture work together.
Why Braising Works So Well for BBQ
Most BBQ “toughness” is really just collagen doing what collagen does. Cuts like chuck roast, brisket point, pork shoulder, and dark meat chicken have connective tissue that only becomes tender when it has enough time at the right temperature range.
Braising helps because it:
- Prevents surface drying: The cover traps steam so your meat stays juicy.
- Accelerates tenderness: Moist heat helps collagen break down efficiently.
- Protects sugars in sauces: Covered cooking reduces the risk of scorching.
- Pushes flavor deeper: Sauce and aromatics become part of the final bite.
In other words: build the bark first, then braise to finish, then uncover to set the glaze. That’s the rhythm.
The 4 Stages of a Great Pitmaster Braise
1) Build flavor first (uncovered)
Start uncovered to develop color, render surface fat, and create texture. This is where seasonings shine and smoke actually sticks. If you cover too early, you’ll steam the exterior and lose that signature BBQ bite.
2) Pan it when the bark is set
The best time to pan is when the exterior looks “done” even if the interior isn’t. Think: deep color, dry-to-the-touch bark, and a confident crust. For many cooks, that’s around the 160–170°F internal range for big cuts, but bark is the real indicator.
3) Add just enough liquid
The goal is not to drown the meat. You want moisture and gentle steam, not soup. A small splash of broth, water, or sauce is usually enough. As the meat releases juices, the pan will naturally create more liquid.
4) Uncover to finish strong
The last step is where good BBQ becomes great BBQ: uncover and let the sauce tighten. This concentrates flavor, improves texture, and gives you that glossy, sticky finish that looks like it came off a competition pit.
Pan + Foil Rules (So You Don’t Kill Your Bark)
Most braising failures come from one mistake: covering too soon or covering too loosely. Here’s the simple rule set pitmasters follow:
- Rule #1: Don’t cover until the bark is set and dark.
- Rule #2: Cover tightly—steam is your “gentle finish” tool.
- Rule #3: Use a shallow pan when possible (more sauce contact, faster glaze).
- Rule #4: Uncover near the end to tighten the sauce and restore texture.
Quick test: If the sauce is watery and the exterior looks soft, uncover for 10–20 minutes and let it reduce. If the exterior is drying out, cover again and finish gently.
Choosing the Right Braising Liquid
Your braising liquid determines the “vibe” of the final bite. Here are pitmaster-approved options and when to use them:
- Broth or Water: Best when you want meat flavor to stay front-and-center and keep sauce from getting too sweet.
- BBQ Sauce + Splash of Liquid: Best for sticky finishes and glazed results -- ideal for burnt ends, chicken quarters, and saucy sides.
- Butter (small amount): Adds richness and smooths sharp edges in peppery rubs; great for beef burnt ends and potato braises.
- Aromatics (garlic, onion, herbs): Adds depth -- but keep it simple so it doesn’t fight your rub.
If your sauce is sweet or molasses-heavy, always consider a small splash of broth or water to keep it from scorching and to make it “braise-friendly.”
Temperatures, Timing, and “Probe Tender”
Braising is less about chasing a magic number and more about hitting the right tenderness. Still, here are reliable targets:
- Big beef cuts (burnt ends, chuck, brisket point): Braise until probe-tender, often around 200–205°F internal.
- Pork loin: Cook to 140°F then rest to 145°F for juicy medallions (loin is lean, don’t overcook it).
- Chicken quarters: Braise until tender and pulling from the bone; internal temperature will usually be well above 175°F.
- Potatoes: Braise until fork-tender; timing varies by size.
What “probe tender” means: A thermometer or skewer slides in with little to no resistance, like warm butter. When you feel that, you’re done, even if the number isn’t exactly what you expected.
Common Braising Mistakes (And How to Fix Them)
Mistake: My bark got soft.
Fix: You covered too early or too long. Uncover to reduce and tighten the sauce, then let the exterior re-set for 10–30 minutes.
Mistake: My sauce burned.
Fix: Too much direct heat or sauce too thick/sugary. Move pan fully to indirect heat, add a splash of broth/water, and keep it covered during the tenderizing stage.
Mistake: My meat is “done” but still tough.
Fix: It needs more time. Tenderness comes from collagen breakdown, not just internal temperature. Cover and keep cooking until probe tender.
Mistake: Everything tastes salty.
Fix: Your brine or rub load was heavy. For brined proteins, rinse briefly, pat dry thoroughly, then season lightly on the exterior.
How This Pro Tip Shows Up in the “Bold & Braised” Box
This month’s box was built around braising because it’s the fastest way to deliver that “wow” tenderness people associate with great BBQ.
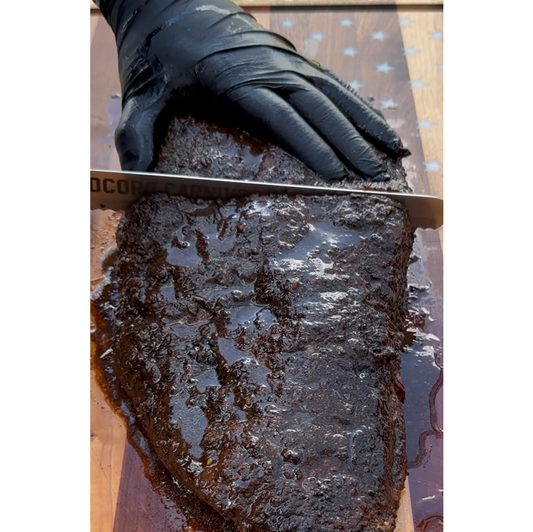
- Beef Burnt Ends: Build a peppercorn bark first, then braise covered to get that sticky, tender finish.
- Chicken Quarters: Smoke for flavor, then braise in sauce to finish juicy and pull-apart tender.
- Baby Potatoes: Smoke first, then braise covered so the sauce clings without scorching.
- Dill-Brined Pork Loin: Brining sets the foundation; glazing late keeps the exterior flavorful without burning.
If you missed this month’s box, you can still explore flavor pairings and build your own lineup with our bundle builder here: Build a Bundle.
Cleanup & Grill Care (Don’t Skip This)
Braising is saucy—and sauce drips happen. A clean grate cooks better, tastes better, and prevents flare-ups the next time you fire up the grill. If you’re cooking sauced pans often, keep your cleaning tools dialed in and replace worn brushes as needed.
Need fresh tools? Here’s our grill cleaning lineup: Grill Brush & Cleaning Collection.
More Ways to Cook With Us
Want more technique-driven BBQ content and monthly boxes built around real cooking fundamentals? Join the club or explore past themes and bundles.
Ready for the next box?
Subscribe for monthly BBQ inspiration, new sauces/rubs/tools, and recipes built to make you better at the grill.
Further Reading
If you want to go deeper into the science and food safety side of low-and-slow tenderness, search these well-known references (we recommend reading from primary sources): USDA Food Safety (Safe Minimum Internal Temperatures), AmazingRibs.com (BBQ technique and doneness concepts), and Serious Eats (braising fundamentals and moisture management).
Happy grilling,
The Grill Masters Club Team
Join 100,000+ Grill Masters
Get weekly recipes, pro tips, and exclusive deals sent straight to your inbox. plus 10% off your first order.